How to Paint Animals

How to Paint Animals and Fur

NEW RELEASE 2013

(Novice / Advanced Techniques)

Have you always struggled to paint fur?

NOW YOU CAN LEARN EXACTLY HOW I PAINT ANIMALS and FUR

Click link for full details

HOW TO PAINT ANIMALS

how to paint animals

Click link for full details

10 years after my 1st eBook “Painting Wildlife in Oils” I bring you my most in depth painting book ever!

Learn EXACTLY how I paint animals!

Over 135 High Resolution color Photos!

130+ Pages!

I cover it all!

Including – Snow Leopards, Tigers,  Leopards, Elephants, Jaguars, Bears and more!


100% money back guarantee, as per usual on ALL my products

BUY The E book NOW
(instant download)

Only $30 USD
(approx. £20)

buy now button

Tiger Painting Continued – Painting the fur details

Here’s a quick update showing you the progress on the Tiger painting. As you can see I have added a lot more details and also more realistic colours. I will glaze here and there when this layer is dry (24 hrs) to add more punch and also more realism, then I will put in the finishing touches like Whiskers etc.

tiger painting fur details

Painting Fur – part two – wildlife art

Update 13th May 2013

I have just released my brand new painting ebook – How to Paint Fur

Its full of EVERYTHING you need to know to be able to confidently Paint Fur today!

Full detail s on my advanced fur painting techniques site or click the photo below


advanced fur painting techniques

advanced fur painting techniques

Hi everyone,
The question I get asked more than any other by beginners is “How to paint thin lines for fur etc”.

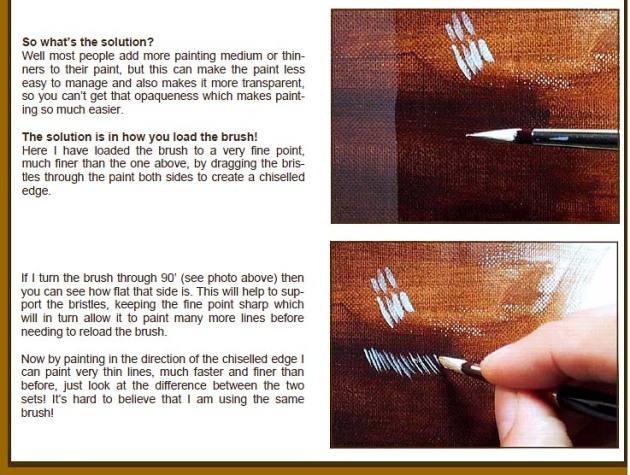
So I thought it might be of use to post a page from my wildlife art ebooks here, just to explain how I get around the problem.

Where I find most beginners go wrong is that they immediately think that to paint fine lines they need to either use a very small brush, or something like a rigger and they also think they will need to thin the paint down with medium almost to a water consistency.

Both these ways have dissadvantages though (IMHO).

By using a tiny brush you will only get 1 or 2 strokes before you will need to load up the brush again, and when you consider how many hairs need to be painted on the usual wildlife painting, that is going to be a problem – big time.

By thinning the paint down lots with medium the paint become transparent or semi transparent, which usually means that the paint hardly shows up etc.

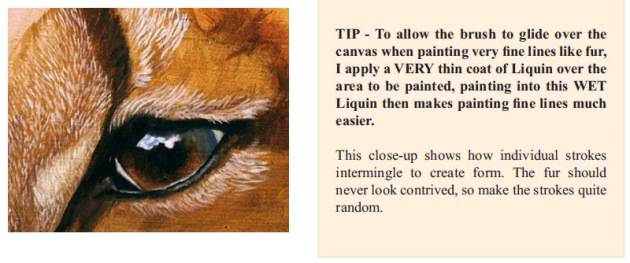
So I have found over the years, that it is usually better to keep the paint nice and thick, use a fairly large brush, and load it by dragging 1st one side, then the other through the paint to make a chissled edge, then wet the painting surface with a tiny amount of medium (I’m using Alkyd Walnut medium at the moment). In fact It’s probably easier for you to see in the pics below

Don’t get me wrong, I also use a rigger, but that is usually reserved for the final hair details or for very long fur strokes.

Hope some find this of use.

CLICK EACH PHOTO TO SEE LARGER

how to paint furhow to paint fur

SEE ALSO – HOW TO PAINT FUR


How to Paint Fur – Texture (short fur)

Note – Update 2013

I have just released my New Learn to Paint Animals eBook

Details are on my “learn to paint oils” Tutorial site

paint fur


I’ve been asked about painting fur lots of times, and I thought it might be useful to start a new post and show another example.

I took this one from my Learn to Paint wildlife in oils ebook, but there are other examples on my other ebooks too.

These are just screen grabs so I hope the quality is still OK to read when I upload them here. I’ll put in some extra text to explaine it all a little more

Hope it’s helpful

If the photos are not large enough to read try clicking them and they should open in a new window 🙂

how to paint fur

painting animals

I guess I shoul dreally be asking everyone to download my ebook sfor all these details, but I guess it is Xmas coming up 🙂 so hope you like it

And if you would like to read more about painting wildlife you can click here

Learning the Basics of Painting. How to Paint Fur.

Lots of people struggle to learn to paint fur and it’s my most asked question,  so I thought I would take a page from my “Wildlife Art On my Easel” ebooks to show you have easy fur painting can be when just a few simple techniques are used.

Click each image to get a larger view, sorry about image quality (blogs compression has reduced it).

Hopefully the images are large enough for you to read as blogs can have limits on image size sometimes.

How to Paint Fur – Tiger Tutorial

UPDATE 13th May 2013

As promised I have listened to your opinions and just completed my brand new eBook packed full of ADVANCED fur painting techniques and tutorials. The eBook is called “How to Paint Animals” and is available right now for instant download and also on a computer CD (for a limited time only)

Full details are on my wildlife art tutorial site or click the photo below 🙂

advanced techniques painting fur

advanced techniques painting fur


From the Poll it appears that most of you would like to see more fur tutorials and tips, so here is an excerpt from an article I wrote in Artists & Illustrators magazine, if you didn’t see the article in the mag hopefully you will find this of use 🙂

It might appear that I painstakingly brush in each individual hair. But that type of painting can become very tedious, so I concentrate on just giving the impression of detail such as fur and hair.

I use fast-drying Winsor & Newton Alkyd Oil paints – which consist of pigment in oil modified alkyd resin – so there is minimum waiting time between drying stages.  Whether you paint tigers, gorillas or poodles, the following stages will help you depict realistic fur…

Image number 2) This is the blocking-in stage. Paint the colour and tone deep down in the fur, the area you can see between all the surface hairs – it’s frequently a dark brown or grey. At this stage, don’t worry about details. Your aim should be to give the animal a solid structure. The details will come soon enough, and you will need something quite dark underneath them.

tiger-demo-1

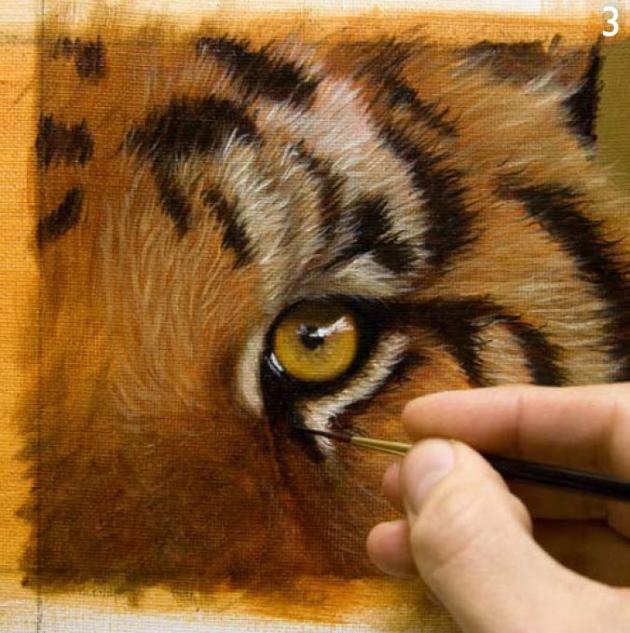
Image Number 3)  This is really a mid-texture stage.

Remember: fur is made up of not just hair but also air. There is usually depth to it, so try to imagine what it would feel like as you paint it. This stage helps to create the appearance of depth and thickness to the fur – I frequently do it while Stage 2 is still wet. Use quite loose brushstrokes, especially when painting long fur, and try to detach yourself from thinking about where each stroke is going to go as you paint. If you think about it too much it can look regimented and unrealistic. Always paint in the direction of the fur’s growth.
tiger-demo-2

Image number 4) Complete this stage after Stage 3 has fully dried (essential if you are going to glaze). Begin by knocking Stage 3 back with a fairly dark glaze (a thin wash of colour). This then automatically becomes mid-depth fur. Then, when it is still wet, add the final details using a rigger brush. It’s surprising how few details need to be applied over the other layers to give the illusion of fur.

tiger-demo-3

Image number 5) Refine the fur, glazing where necessary and adding a touch more detail here and there – in the case of this tiger, whiskers and the white hairs on the surface of the coat.

tiger-demo-4

Hope you liked it and don’t forget to leave your comments 🙂

This Tututial is also in my brand new ebook with even more text.

Learn to paint site

online gallery

You can download 2 FREE pages right now – PDF files